Showing posts with label Primary Math. Show all posts

Thursday, October 18, 2018

Stamp Game - Static and Dynamic Addition

Today, Nito worked more with the stamp game.  He learned the concept of dynamic addition.  For those of you who are new to the stamp game, it is simply an extension or moving more from the concrete to the abstract.  This material allows for the introduction of how to write the problem on paper along with using symbols.  Like other addition and subtraction work, we will have static and dynamic equations for the child to practice.  Static equations do not involve carrying or borrowing.  Therefore, dynamic equations will involve the child carrying into the tens, hundreds, or possibly thousands column for addition.  Regarding subtraction, this might entail the child having to "Borrow" from his neighbor "Mr. Ten", or "Mrs. Hundred" to find the answer.  Below is an example of each:

STATIC ADDITION:

Here is a picture of the set of equations that we use for the stamp game.  It breaks the equations up for the child depending on what they are working on.  The answers are on the back which help create independence for the child.
 
The stamp game can be used for all four operations (addition, subtraction, multiplication, and division).  This is the material, which again is color coded for the child. Hence, green is for units, blue for tens, red for hundreds, etc.

The stamp game also has specific paper to make it easier for the child, but you could easily make this yourself or use graph paper.

Here is what the equation card looks like.  Again, these equations are fantastic because they are color coded for the child.

I have Nito write out his problem on the paper before he begins to set up his material on his felt mat. 

Here is the problem laid out in the beginning.  He first sets out the top number. 

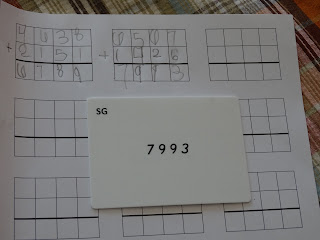
Then he lays out the second addend underneath.  (If you click on the picture, the card with the number will be easier to see.  I'm sorry if there is a glare.) 

This picture shows that he starts with the units.  So he pushed his 1 unit up with his 8 units since he is adding.  Then he counted all of his units again to find that he had 9 units altogether.  

Then he recorded his answer for the units.

Then he continued with the tens, and so on.

Recording his answer as he goes.
 
When he is done with the problem, he turns the equation card over to check his answer.  Yay!  He got it right.  (The SG in the left hand corner indicates Stamp Game.  We have additional equations for the Golden Bead Material (GBM) in the same box so it is helpful to have them labeled.)

DYNAMIC ADDITION:


Nito set up his problem in the same manner as if doing static addition.  He laid out his first addend.

Then he laid out the second addend below.

He pushed his 6 units up with the 7 units.  Then he starts to count them.

He stopped when he got to 10 and then replaced the 10 green unit squares with a blue 10 square shown above.

Now the blue 10 unit was put at the bottom of the tens column and the units column now has the remaining units, which is 3.  He then recorded the 3 units on his paper.

He continued with pushing the tens together, counting, and recording his answer.
 
When finished, he checked his answer.


Saturday, May 14, 2016

Addition Strip Board and Finger Chart

Finally some new math materials for Bubs!!
Bubs was very excited to have new math materials.  He had been working with the snake game for awhile and stopped pulling out the ten/teen boards awhile ago.  He goes through phases of working with the paper decanomial and the bank game.
 
 We started with the addition strip board.   This board has a row of numbers 1 through 18 across the top.  The numbers 1-10 are red and the numbers 11-18 are blue.  There are also 9 red bars and 9 blue bars.  The smallest rod is labeled with a 1 and the longest is labeled with a 9 with the remaining numbers in between.

I have a few containers with simple equations.  For example, in the picture above, he has the equation 9 + 4.  He takes the 9 red bar and the 4 blue bar.  They are placed side by side horizontally.  Then he looks at the numbers at the top to see what number he has formed.  Both bars together end at 13.  He then knows the answer is 13. 

Here is a closer look.  He did this work until he finished the container and moved on to the next one. He thought it was pretty easy which was what I was afraid of.  He has passed this material, but it is a good stepping stone for his addition work.   

I quickly started him on the first finger chart.  He was pretty excited to have his own clipboard, special paper, and a pencil for this work.  This chart is officially called the Table of Arithmetic, but we definitely wouldn't want to tell Bubs that!  It might overwhelm him. 

The setup of the board is red numbers from 1 to 9 vertically down the side with blue numbers 0-9 horizontally across the top. All of the other squares are the sum of one red number and one blue number.  The child uses his fingers to find the answer.  For example, the equation above is 3+5.  Bubs puts his left finger on the red 3 and his right finger on the blue 5.  Then he slides his left finger across and his right finger down until they meet in the middle at 8, which is his answer.  Before he finds his answer, he writes his equation on his paper.  Then he fills in the answer once he finds it.  (The paper is just a simple graph paper with large squares. You can download it for free here.)

I did discover that this work is not necessarily full proof.  I noticed that on one equation, he slid one finger down to the other row as he was sliding, which then made his answer incorrect.  I just used that as a point of interest for the next equation.  He will continue to work through all of the equations before we move on to the next finger chart for addition.  Right now, I have every equation from 1+1 through 9+9.  He was very excited when he got 9+9 because he was able to use the highest number on the board.  If you click on the pic, you can see his equations written on his paper.  Sorry I didn't take a better pic of that. 


Wednesday, April 6, 2016

Addition Snake Game


Bubs has been settling in well with the addition snake game these days.  I think he will be ready for the subtraction (negative) snake game soon.  He just figured out how to check his work with the control of error built into the materials.  He loves to make extremely long chains, but then quickly gets overwhelmed in the middle of it.  Then he goes to the opposite extreme and makes a snake with three bead bars.  What are ya gonna do?!

The snake game is quite an interesting material and is a fun way to learn the different ways that you can make the number 10.  The child lays out a combination of bead bars in any order in the shape of a snake (or zig zag).


Here is a sample snake that Bubs worked on today.  You can see the three sections of the material.  The left box has the 10 bars which will be used for exchanging.  The middle box has colored beads for making the snake.  The right box is for the beads for the black stair.  The black stair is used as a place holder when counting.

 
He starts counting each bead bar until he reaches 10.  In the picture above, there is a 3 bar, a 5 bar, and a 4 bar.  The red pick thing (Ok, I don't know what it is called, but it looks like a guitar pick!) holds the place for the child while he gets the 10 bead for exchanging.  So, 3+5+2 is 10, but you still have 2 more beads which are part of the 4 bar. That is why the red pick is in between the beads on the 4 bar.

 
Here, Bubs has gotten a 10 bar (which takes the place of the 3 bar, 5,bar and 2 of the beads from the 4 bar).  He took the 2 bar from the black stairs to represent the last two beads from the 4 bar.  Now he will put the 3, 5, and 4 bar in the cup on the right to show that he has counted them.  He then starts to count again up to 10, starting with the black 2 bead bar.

 
He continues through the snake, exchanging for 10 bars along the way.

 
When he is finished, and has worked with it for some time, he does the extension of checking his work.  He places the 10 bars that he exchanged at the top of the mat.  Then he lays out all of the bead bars that he counted from the cup underneath the 10 bars.  He lays them out from smallest to largest, notice the 1 bar on the far left side.

 
To start checking his work, he places the largest bead bar (9 in this problem) next to the 10 bar.  Then he looks to see how many more beads he needs to equal 10.  He needs a 1 bar.  He takes it from below.  Then he takes the next largest bead bar (8) and moves to the next 10 bar.  He sees that he needs a 2 bar, but only has a 3 bar.  He then exchanges his 3 bar for a 2 bar and a 1 bar from the middle box above. Then he adds the 2 bar to the 8 bar to make 10.

 
He continues with the 7 bar and using the 4 bar below to exchange for the 3 bar needed.

 
He keeps exchanging,

 
Yay!!!  He ended up with no beads left over.  So how many beads did he count?  50  (There are 5 10 bars.)  He was very excited to get his answer right because this meant that he could go upstairs for snack!  Stay tuned for the negative snake game hopefully soon.

Sunday, January 31, 2016

Golden Bead Addition

I apologize for not posting this sooner.  I think I uploaded the pictures and then life happened and I completely forgot.  Nonetheless, here is some info on Bub's bank game work.  He has since moved on through subtraction and is currently working on Golden Bead Multiplication which I presented to him today. 

The picture turned out darker than anticipated with the green felt.  I think you can still see the addition sign and equation bar.


I recruited Kui to be Bubs' partner since at that time I only had one primary child.  Here they are gathering their beads to form their number.
 
More gathering.

After the beads were both gathered, he puts his beads on one rug to "put them together" to find the total.  He was quite excited to see how large of a number he had once he put everything together. 

Saturday, September 26, 2015

The 1,000 Chain

 
Well Bubs has made it to the 1,000 chain!  I really can't believe it.  He is really into counting and numbers these days.  When we are at Mass, he just opens the missal and starts counting the numbers in the Table of Contents!  He does seem to always point out to me the number 23.  He says, "Look Mommy that's how old you are!"  I have to remind my dear son that I am indeed not 23, but rather 32.  Clearly we have a little more work to do. 
 
Anyway, back to the 1,000 chain.  Bubs was sailing through the teen board and ten board so I moved along and presented the 100 chain to him to see how he would do.  Well.....he did it correctly the next time he took it off of the shelf on his own, so I watched him do it one other time by himself and then moved him on.  But here is where the challenge began.  Now I had to get creative with this gigantic chain.  Where shall we do it?  Do we have enough work rugs?  How can I time this presentation to fit nicely into T-Man's nap time?  (I wouldn't want 1,000 beads rolling all over the hardwood because T-Man thought the chain makes a better necklace or toy than a material!  It was sort of a spur of the moment presentation because he was asking for something else so I winged it (which is never a good idea to do in primary since the child really needs that sense of order and all of the materials ready for him as opposed to the elementary child).  Nonetheless, I persevered and improvised.  Only my daughter knew that I was using the Black Strip from elementary as a work rug (Shhh!).  But hey, it worked perfectly!  When you are homeschooling on a budget, you really have to work with what you have.  That thing was collecting dust anyway.  (Until now, because my daughter saw it again and of course wants another presentation on it like yesterday.)


Bubs was placing a hundred square at every hundred beads.

We managed to stretch the chain from the far end of the living room to halfway through the kitchen.  Thankfully T-Man slept the whole time.

Bubs really did the entire thing by himself.  I started him off and it is basically counting by 10s all the way to 1,000. It looks like this: 1, 2, 3, 4, 5, 6, 7, 8, 9, 10, 20....100, 110, 120,.....980, 990, 1000.
 
Then at the end, you can put the 10 hundred squares next to the 1,000 cube to show that there are 1,000 beads!  Voila!! 
 
He did get it out the next day, but T-Man was awake so it was quite interesting to see how he managed to lay it out in the classroom.  He made it all the way to 700 before Nito had his way with it and messed up the labels.  Boy oh boy you can imagine how that went down........

Monday, March 2, 2015

Bank Game (Primary)

My son, Bubs (nicknames will be used), was itching to get his hands on the really cool looking golden bead material on his sister's math shelf.  However, he hadn't completed or even started the two presentations needed before it. So I told him we have to do this and this first.  He was like, "Oh dear!"  So I made sure I got those presentations set up and got him moving and grooving on those.  I tried to keep encouraging him to get through them so he can reach the "cool" material.

Side note:  We started this homeschool journey rather suddenly and did not start with a prepared environment.  I am buying and making materials along the way (ok really staying up late the night before to ensure the chart is colored, cards laminated, etc) so the presentation can go smoothly.

Ok back to Bubs.  He finally made it to the bank game!!  I was super excited to present this to him and made sure I practiced the night before.  For those of you who are unfamiliar with this material, it is simply a game of matching the correct amount of beads to the card on the tray.  The picture below shows the setup.  The bead material on the left rug with the cards on the right.  There is a small rug that goes in between to put your answer.  The child uses a tray to fetch the beads.


Now the moment of truth.  We began the presentation, but things weren't going as smoothly as anticipated.  Not sure if I went wrong or if I had misread his readiness signs, but he was not getting it.  I could tell he was starting to get discouraged so I quickly moved into cleanup so that hopefully he will choose this from the shelf again.

The next day, he was wandering around the classroom and lo and behold!  He pulls out the bank game and asks if I can work with him.  (I was doing my happy dance on the inside, but of course had a serious professional teacher face on the outside!) So he got out his work rug and we began.  I started slowly and carefully ensuring that he understood and was not getting frustrated.  He was very excited to fetch 4 units for me and then 9.  Then we worked up to the 10 card. It seemed to click right away this time and so we ventured into the hundred cards.  At this point I was doing the choosing of the cards, but he wanted to give it a try.  I just made sure he chose one that I was fairly certain he could do so he wouldn't get discouraged.

Another side note: For any of you who are AMI trained or know about Montessori, I am quite aware that the work rugs should indeed be white.  However, when you are doing this in your home on a limited budget you will find that blue and green solid rugs work quite well for a reduced price.  Maybe one day when all my materials are bought, I might invest in some white work rugs!

Bubs continued to take more cards and matched with the correct amount of beads.  His sister, Kui, was working with the checkerboard at the same time and he heard her mention "tens".  His face lit up and grabbed a ten bar and ran over to show her that this was "10" too.  Those are the moments that make all the hard work worth it.  It finally clicked and he is happy to have his little hands on the "cool" material.  Now I guess that means this teacher needs to study up on the next presentation in the series.  


Here is a picture of his finished work.  He was very proud of himself.  (Ok some of them are not lined up correctly, but he got it!)